Tuesday, November 29, 2011

Cable Bracelet


Note: Hey! So this bracelet is pretty much just...a cable. The whole thing is really just a cable (with a bordering). It's a great project to practice your cables on, and well, it's really cute! Plus, you can knit the ring smaller to make a napkin ring at the dinner table, you can knit it longer to have a purse strap, it could be a headband, there's countless ideas!

MATERIALS:
Size 8 (5.0mm) knitting needles
Medium (4) yarn (in the pictures, I used Andes Alpaca yarn in 730 Damson)
Cable needle (I used a size 2 (2.75mm) needle)
Yarn Sewing needle

Note: This stitch is crossed every six rows. (Multiple of 10)

1)Start off by casting on 10 stitches.

2)
Rows 1 and 3: knit 2, purl 6, knit 2
Row 2: purl 2, knit 6, purl 2
Row 4: Purl 2, slip next 3 stitches onto cable needle and hold in back or front depending on the direction you want, (I held mine in the front), knit 3, then knit 3 from cable needle, purl 2
Row 5: Knit 2, purl 6, knit 2
Row 6: Purl 2, knit 6, purl 2
Start back at Row 1 to continue!

3) Continue knitting the cable and occasionally wrap around you wrist to check for length. (mine was about 8 inches, I had a 5 1/2 in. circumference wrist)

4) When your cable is at a length that you like simply bind off.

Sewing it Together:

1) Thread your yarn needle (with same yarn), turn bracelet to the inside (non cable side)and simply sew the seams!
(If you don't know how to, a great link is:
http://www.videojug.com/film/how-to-sew-seams-together )

2) Turn your bracelet inside out and enjoy!

Tuesday, November 22, 2011

Simple Quick Hat (Straight Needles)


Note: These hats are particularly simple. The only skill required is the ability to knit both garter and purl stitch for the ribbed cuff. There is no increasing or decreasing. From the picture, I am seen wearing the multicolored hat, which was the Red Heart Super Saver 399 Fiesta Jewel. From the picture, the hat on the right was used with the Red Heart Super Saver 387 Soft Navy. Unfortunately, I do not know the yarn used for the white hat, but it is a scratchy mohair like yarn.

MATERIALS:
Size 11 knitting needles
Yarn (at least have 1/4 of skein)
yarn sewing needle
Pins (optional)

1) Cast on 60 stitches and knit a rib in a knit 2, purl 2 fashion for 2 1/2 inches.

2) Once done with the rib, knit in garter for 5 inches.

3) Once hat is 7 1/2 inches long, bind off.


Sewing it Together:

1) Take your rectangle and fold it in half. Be sure to fold it so that what's to be the inside of the hat, is now facing outwards. (We're going to fold it inside out in the end)Pin the edges of the hat with pins if you have them.

2) Take your sewing yarn (should be the yarn you used to knit with) and tie it to your sewing needle. Sew the seams.

3) You should now have a tube. Remove the pins if used. Next, to sew the top of the hat, tie yarn to your sewing needle, and at the top of the hat (about 1 cm from the top), insert your sewing needle and begin weaving the yarn in and out of the hat. Pull tightly on the yarn as you weave, there should be a drawstring effect. (weave in and out about every 3 stitches) Once back at the beginning, pull VERY tight, being sure to not sew below the drawstring line, begin stabbing and sewing the clump in every direction until the clump is very dense and compact. Take your yarn and wrap it around the dense clump 3 times, stab your needle through the middle of clump, and tie a knot. Cut off.

4) Flip your hat inside out! Yay! You're done!

Monday, November 21, 2011

Fingerless Elbow Gloves/Mittens Base (Straight Needles)


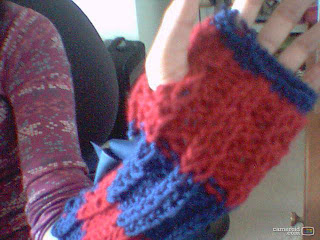
Note: These gloves/mittens do not have stubs, as they have a thumb hole, and cut off at the fingers. Also, I like to use accessories for my projects, and without accessories, these might come off a bit plain. These fingerless glittens also happen to be about 13 inches long. Because the picture is not yet available, these glittens switch off from two colors, min are burgundy and navy blue, and are ribbed throughout the whole thing except on the tip near the finger cut off where this is about 3/4 inch stockinette.

MATERIALS:
Size 11 (8 mm) knitting needles
Size 8 (5 mm) knitting needles (used for stockinette cut off)
Two different yarn colors in size 4 worsted (I used Red Heart Super Saver 376 Burgundy and 387 Soft Navy)
Yarn sewing needle
Scissor
Pins (optional)
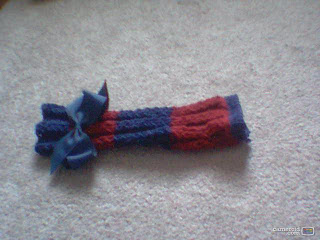
Acessories such as buttons, clips, business buttons, ribbons, ect (optional, but hightly suggested for glitz and glam!)

GAUGE: 4 stitches = 1 inch ribbing; unstretched.

1) Start by casting on 24 stitches (on the size 11 needles/8 mm) and knit a rib in knit 2 purl 2 for 2 1/2 inches.

2)Once your first color is 2 1/2 inches long, cut yarn and tie on second color. Continue the knit 2, purl 2 rib for 3 inches.

3) Once your second color is 3 inches long (total piece being 5 1/2 in), cut yarn and tie on first color, knit in a knit2, purl 2 rib for 3 inches.

4) Once your third color is 3 inches long (t.p. being 8 1/2 in), cut yarn and tie on your second color. Knit in a knit 2, purl 2 rib for 3 inches. You should have a total of 4 color changes, 2 in your first color and 2 in your second.

5) For the stockinette edging, transfer your stitches onto size 8 needles (5 mm, and start your stockinette purling your first row. Knit in stockinette for 3/4 inches. Bind off.


Sewing:

1) Fold your rectangle in half length wise. Be sure to fold your piece with what you want to be out inside, facing outwards. (We're going to flip it inside out in the end)Also, if you own them, it's good to using sewing pins to pin the edges together so that they don't move while you're sewing.

2) Next, take your yarn (should be one of the two colors your used) and run it along the length the glitten three times. Once up the side, once down the side, and once again up the side. Tie your yarn to the needle, and begin to seam the edges. (If unsure how to seam, be sure to look up a thorough video, we want the seams to look pretty :)

3) Continue sewing until about 3 1/2 inches of the glitten are left. Tie a knot and cut off. Don't sew for about 1-1 1/2 inches. This is going to be your thumb hole. My personal glitten has about a little less than 1 1/2 inch thumb hole, which is pretty good for me. To be sure, place your hand inside the glitten, place your thumb where the thumb hole should be, and mark where you want the thumb hole to end. Once your thumb hole location is decided, tie on and continue sewing to the end. Take out pins (if used), fip your glitten inside out, and try on!

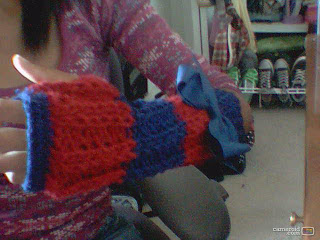
4) I must admit without customizing and or accessories, this particular piece comes off a bit plain! You may like it, but feel free to add ribbons, bows, buttons, clips, etc. this pattern is however just a base to your extensive imagination!

Original pattern by Emily Pritchard

Pictures

Hello, fellow friends, unfortunately, I will not be posting pictures with the following patterns. However, they will be arranged to appear some time this month. Happy Knitting!

-Sincerely,
Emily P.

Welcome to Blueberry Ice Knits!

Hello! Greeting from me, your blog host Emily :) So, as you can probably already see by the blog title, this blog is about knitting. On this blog I will post my own original patterns as well as some from already published collections. If ever you feel the need to share a pattern on this blog to others and or me, feel free. You can learn more about me under the link labeled "View my complete profile," to the right. Have fun and keep knitting!

-Sincerely,
Emily P.